


Salon nails at home – Best tips for sustainable nail extensions!
Can you do nail extensions at home?
Doing nail extensions at home has become increasingly popular, and it's not hard to see why! With the right tools and a little practice, you can create professional nails at home without having to book expensive salon visits. In this guide, we'll go over what you need and how you can do safe and durable nail extensions at home, step by step.
Want more tips on how to do beautiful nails at home? Here you will find the best guides from Nail Expert!
What is needed for nail extensions at home?
Before you start your nail extension, you need the right products. Here are the basic tools to create beautiful nail extensions at home:
-
Nail gel, gel polish or acrylic : To create the extension itself. We recommend using high-quality products. A good start for nail beginners is to learn with simpler nail materials such as our poly gel , which is both flexible and easy to work with. Once you have learned the technique, you can try other nail extension materials such as gel.
-
Nail tips or templates : To create length and shape on your nails. Here you will find our range of nail tips and nail templates for different techniques.
-
UV/LED lamp : To cure your gel. We offer a variety of UV lamps, which you can find in our UV /LED lamps category .
-
Nail file and buffer : To shape and smooth the surface of your nails. Choose from our wide range of nail files for the best results.
-
Cuticle Oil : To keep your nails and cuticles healthy. Our cuticle oil is a perfect complement to maintain healthy nails.
-
Top coat and base coat : To protect your nail extensions and give a nice finish. Our base & top coat is an all in one product that is perfect for beginners who want to start their nail journey with an affordable nail product.
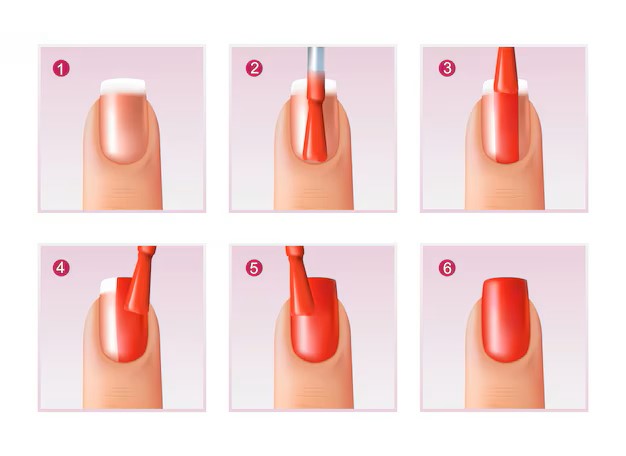
Step-by-step guide to nail extensions at home
Step 1: Prepare your natural nails
Start by cleaning and filing your nails to the desired shape. Wipe off any oils and dirt. Roughen the nail bed with a 240 grit nail file. It is important to create a rough and clean surface for the extension to adhere properly.
Step 2: Apply primer & base coat
Apply a coat of primer , let dry. Then apply a thin layer of base coat to protect your natural nails and improve the adhesion of the gel or acrylic. Cure in your UV lamp for 60-120 seconds. Note: It is very important that no products touch the skin and cuticles.
Step 3: Attach nail tips or templates
Attach nail tips or use templates to create the desired length. If using templates, be sure to shape them properly before applying gel or acrylic.
Step 4: Apply gel or acrylic
Apply a layer of gel or acrylic and build up the extension. Make sure to work in thin layers to avoid clumps and the product not curing properly. Cure in the UV lamp between each layer. (Acrylic does not need to be cured in the lamp).
Step 5: Shape and file the nails
Once the gel or acrylic has hardened properly, use a nail file to shape your nails and create a smooth surface. For best results, use a fine nail file which you can find in our nail files category . .
Step 6: Apply top coat
Finish with a layer of top coat to add shine and protect your extensions from wear and tear. Cure again under the UV lamp.
Step 7: Final finish and nail care
To give your nails a nice finish, apply cuticle oil to keep your nails soft and healthy. It's also a good idea to maintain with oil a few times a day to provide extra nourishment to your nails and for a lasting result of the extension.
Common mistakes to avoid when doing nail extensions at home
-
Incorrect curing time : Make sure you cure each layer properly in the UV lamp. Failure to do so may cause your extensions to become sticky or not hold properly. It can also result in allergies if the product is not cured properly. Always use lamps recommended by the manufacturer to ensure that the lamp is compatible with the nail products you are using.
-
Too thick layers : Work in thin layers, especially when applying gel, gel polish or acrylic. Too thick layers can cause the nails to not cure properly.
-
Lack of nail care : Don't forget to nourish your nails after extensions. Use cuticle oil to keep your nails healthy and strong.
Among our precautions, you can read more about important things to consider when it comes to building nails at home.
Benefits of doing nail extensions at home
- Cost-effective : You save money by doing nail extensions yourself instead of going to a salon.
- Flexibility : You can get nail extensions done when it suits you best, without having to make an appointment.
- Creative freedom : Create your own nail design and try different styles without being limited.
Should you buy nail extension products?
Check out our wide range of nail products! We have everything you need to create professional nail extensions at home, from nail gels and nail tips to UV lamps and nail care . Visit our store here to shop and get expert advice.
Conclusion: Can you do nail extensions at home?
Absolutely! With the right products and a little practice, you can create stunning nail extensions at home, saving both time and money. Make sure to use quality products, start by practicing on a mannequin, and follow the steps carefully for best results.
Ready to create amazing nails at home? Explore our range of nail products and start your nail journey today!